Thursday, May 13, 2021

Building the Mega Drop

Figure 1: Mega Drop (With Ramp)

About a year ago we took down a beautiful old box elder in our backyard. It grew on a hill behind our sandbox and swingset. It was big, wide, and had lots of large dead limbs that, unfortunately, were a safety risk for our kids (Figure 2). We had the tree cut down, and were left with a large (approximately 3' diameter) stump on our hill. 

Figure 2: The Box Elder


For this project we used almost exclusively either scrap wood or wood from Home Depot's 70% off pile. I don't have a detailed price list, but I'd guess we spent about $40. 

At first we wanted to build a tree fort, so we used some two by fours to make a level building surface on top of the stump, then we added treated decking boards to build a base. Almost immediately we realized that the "floor" we had created would make an awesome drop for our backyard singletrack trail. We extended the surface so that we had a deck leading from the nearby hillside path to the top of the stump. Soren dubbed this setup the "mega drop."

We used a variety of rocks, logs, and assorted backyard construction materials to shore up the design, then we tried it out. 
Figure 3: Ouch

Although the drop was a reasonable height, the hill on which we had to land was sloped in two directions, which made landing rather tricky. After a mix of successful and unsuccessful attempts, we went back to the drawing board. We decided to change from a drop to a steep ramp, which would maintain the excitement of the descent without the frustration of the sketchy landing. 


Saturday, May 8, 2021

How to Fix a Broken XPower Dump Truck Drive Switch

 My son got an XPower "Pulls up to 50 Lbs!" dump truck for his birthday, but within a week it had stopped working. It would turn on and make noise, but would only drive sporadically. It turns out the problem is a somewhat flaky button design with an easy repair: Add a spring to the button

Figure 1: The XPower Dump Truck Power Button Stopped Responding

Disassembly

There are only two kinds of screws used, both with Phillips heads, so disassembly is easy. You have to remove the wheel drive assembly to get to the circuit panel on which the problem switch is located. 

  1. Remove the bottom plate, which includes the battery pack.
  2. Remove the wheel assembly (all four wheels come off in one large assembly). This will reveal the two screws noted below (Figure 2)
  3. Slide the cab off of the gear and motor assembly. The cab slides "up" from the truck's perspective. 
  4. Remove the circuit board, speaker, and bed-closure button (Figure 3). There is no need to disconnect any wires. 
  5. Remove the button (Figure 4)

Figure 2: Remove these Screws to take off the Cab and Circuit Board

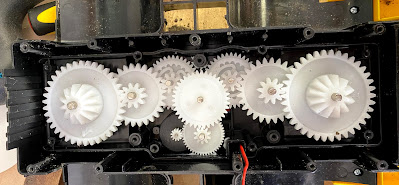
Figure 2.5: Configuration of the Gears

Figure 3: The Circuit Board

Figure 4: The "go" Button is the Problem

Figure 5: The Go Button Switch on the Circuit Board

Repair

The problem is that this button can get stuck in the up or down position. To solve this problem, I added a little spring to the button. I used a metal shears to make a little more room inside the button head (Figure 6), then added a small spring (Figure 7). Make sure that the spring is small enough that the button can still make contact with the switch. 

Figure 6: Making a Little Room for the Spring


Figure 7: Positioning of Spring


Figure 8: Success!